


Каталог статей
| Главная » Статьи » 3DS Max |
Создание Джунглей
Урок на английском... описания особо не много, но мне и картинок хватило, всё предельно ясно  Под некоторыми картинками будут ссылки те же картинки, только большого разрешения Под некоторыми картинками будут ссылки те же картинки, только большого разрешения
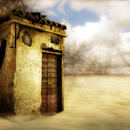
First I want to show you the detail of the object with its UV layout and texture. Keep in mind to always reuse as much of the texture as possible. As you can see in the following picture, the beams where it says '2' all share the same texture(they are not very visible under the thatched roof), but they are rotated 90 degrees around the X-axis to lower the tiling. I don't agree with the step process like 1. Modeling, 2. Unwrapping (mapping), 3. Texturing, etc, because it is a very creative process which cannot be cut into steps. Sometimes I remodel some parts of the model after I have finished the texture, changed the UV layout, etc. For example, the part marked as '1' was primarily just a flat 5-sided polygon. After having textured this part, I thought that it would be best to have this bamboo modeled, so it would better react to lighting. Don't forget to use the Preserve UVs feature in editable poly, so you can move the edges without distorting the UVs. Obviously it is not perfect in all situations, but you have to practice with it, and it will become your good friend There, you can see also the texture. So what can I say that's interesting about it? Yes there is one trick that I have used for the wood... that I have matched the color of the wood to the color of the bamboo so they fit together nicely. I have used a tool in Photoshop called "Match color"(with some levels adjustments) located in Image > Adjustments > Match color. You can also choose a layer from the same PSD file. Sometimes it works great, sometimes not, but it is worth a try in this case it worked great. 
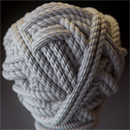
http://www.9jcg.com/tutorials/radoslav_zilinsky/making_of_jungle/making_of_the_jungle_l_01.jpg I needed a ROPE texture for this jungle, but I couldn't find any on net -- so naturally, I had one done up by myself. I thought I would share it with you since it is fully tileable Enjoy. There is the color and normal map and you can see the results on the model. 
http://www.9jcg.com/tutorials/radoslav_zilinsky/making_of_jungle/making_of_the_jungle_l_02.jpg 
http://www.9jcg.com/tutorials/radoslav_zilinsky/making_of_jungle/making_of_the_jungle_l_03.jpg 
Just one thing -- don't forget that when you are making a rope from spline or the most procedural objects like loft, lathe, etc., that they are already mapped! The mapping should be just scaled in one direction in the unwrap modifier to make it correct. On the next picture, there is the same building but it's burnt up. Nothing really interesting except that it's burnt-up looking . Just cutting, deforming, and destroying. It's a great tool for this kind of deformation, in new Polyboost 3 and it's called PolyShift. But one thing I do want to point out is the hanging thatched roof. I will explain to you how it was done, but on the hanging vegetation in jungle... 
Let's start. 1. So, first, we make the hanging vegetation texture from some moss texture...just erasing with the tablet. Make some different shapes specifically paying attention to how you can split along the vertical and horizontal lines, like it is on my texture on the next picture. 2.Then map it onto the simple plane. 3.Cut it into two pieces, so it becomes two strips. Then connect the longer(horizontal) edges of the two strips as many times as the number of pieces of hanging vegetation on the texture in each row. 4.Then move the edges in between the pieces of vegetation with preserve UVs turned on(it works absolutely perfect with perpendicular edges like this). 5. Cut it again as you see on the picture. 6. Apply a bend modifier to polygons as you can see on the picture. 7. Then you can detach the parts into separate pieces, 8. or combine them into compositions or groups. So you have nearly unlimited combinations of this kind of vegetation just from one texture 
http://www.9jcg.com/tutorials/radoslav_zilinsky/making_of_jungle/making_of_the_jungle_l_06.jpg What can I actually say about the jungle itself. Well, for example I have 3 different LOD from the main kinds of vegetation like palm trees. So as the distance fades I copied the lower res models of vegetation. You can see 3 LOD of the main palm on next picture. 
Then I copied the LODs all around in instance mode and also made some variations with bend scale and deform. It is also important to group the vegetations into small compositions. They never grow just singularly. An example is on the next picture 
At the far end of the scene I have made the two circular objects with the texture of a jungle(horizontally tileable). 
http://www.9jcg.com/tutorials/radoslav_zilinsky/making_of_jungle/making_of_the_jungle_l_09.jpg 


So as I can see, I've absolutely ruined my promise of not talking so much, but hope that you will forgive me .. I'd like to talk about the post process, but I have lost the PSD file, shame on me:( I but there is one interesting thing I want to point out. The volume light was done with the z-depth pass and NOT with the classic one, because there is one problem with opacity. The classic z-depth pass counts only with GEOMETRY, which is critical if you have many objects with opacity as I do. But there is a solution. A special material. We will describe this on the next example, a grass scene with opacity. The special material is quite simple - a standard material with self-illumination set to 100%, put the opacity map from objects which has it, into the corresponding opacity slot...otherwise leave it unused. And the most important one of all, put the falloff map into the diffuse slot. The falloff type in this map should be set to Distance blend. Finally just set the near and far distance so it fits your scene and hit render 1. There is actual render of the grass. 2. Classic z-depth pass, see that it counts only with geometry which is absolutely useless for us. 3. Fog pass made with a special material. 4. Composite of 1 and 3(just put 3 over 1 as a screen blending mode in PS, colorize a bit, and adjust with levels). Sometimes it takes little time to rework the opacity materials to this material, but it is worth doing I think 
Конечный результат (Высокое качество, поэтому выкладываю ссылкой) http://www.9jcg.com/tutorials/radoslav_zilinsky/making_of_jungle/making_of_the_jungle_l_15.jpg Автор урока Radoslav Zilinsky | |
| Категория: 3DS Max | Добавил: Nocel (21.04.2009) | |
| Просмотров: 1129 | Рейтинг: 0.0/0 | |
| Всего комментариев: 0 | |


Анонс фильма «Вверх» от
Disney и Pixar

«Новые приключения
Аленушки и Еремы» -
последний крупный
проект студии «Парадиз»?

Идея этой работы пришла ко
мне совершенно случайно:
однажды я поймал себя на
мысли...

Анонс фильма «Монстры
против пришельцев» от
DreamWorks Animation

Интервью со студией
Simpals о проекте "Цыган"

Kornao - это ресурс
посвящённый созданию игр

3Dmaster.ucoz.ru- это портал,
посвященный CG графике.
Статьи, переводы, изображения и торговые марки
принадлежат их авторам и владельцам. Мнение авторов
может не совпадать с мнением редакции.
Любое копирование материалов сайта, только с разрешения администраторов.
принадлежат их авторам и владельцам. Мнение авторов
может не совпадать с мнением редакции.
Любое копирование материалов сайта, только с разрешения администраторов.